
Render Node Part III – Best Practices & Usage
This is the 3rd and final post in my three-part series of building and using your first render node with 3ds Max and Backburner.
Render Node
Part I – “Affordable & Powerful”
Part II – “Network, 3ds Max & Backburner”
Part III – “Best Practices & Usage”
Now you got your very own render node set up and sending jobs to it like a maniac, I’ll share a few ways to get more out of it and some helpful reminders.
Organize your assets
Having a well organized library of assets to use in your scene is a fantastic thing to have. It’s not quick to get it all sorted and it’s hard to keep in order when client work takes over your schedule. It is however worth setting up and will be a huge timesaver down the road.
When I only had my workstation do the renders, everything was mostly scattered about on a large harddisk inside the workstation. I had begun to organize my assets (textures, models, maps etc.) in folders based on the name/company of the asset or where I had bought them.
This was a quick and simple way as that was how the files were delivered. When I needed to find an asset, I would struggle to try and remember the brand of a specific chair or in what package that nice tree was in. That’s no way to work efficiently and it’s so easy to just stick with this quick and dirty solution of finding the asset, curse at the time it took, and then do it again on the next project.
Here’s a folder structure example of what works best for me now:
Models (main folder)
- Exterior
- Plants
- Trees
- Tree 01.max
- Super Special Leaf Texture.jpg
- Tree Maps
- Basic Leaf Texture 01.jpg
- Basic Leaf Texture 02.jpg
- Trees
- Plants
- Interior
- Sofas
- Vintage Sofas
- Vintage Sofa 01
- Vintage Sofa 01.max
- Super Special Leather Texture 01.jpg
- Vintage Sofa 01
- Fabric Maps
- Basic Cotton 01.jpg
- Basic Leather 01.jpg
- Vintage Sofas
- Sofas
You can keep making subfolders from here to eternity, but that’s no fun to browse through later on. So do it as you find reasonable.
Notice how I have my basic textures in a model category folder and then custom maps in the specific model’s folder.
Put basic textures in a “main folder” and model specific ones in the model’s folder.
There’s no need to have the same leather texture in every one of your model folders, neither do I recommend just linking to a specific model folder for them all to share. This can get really messy and hard to manage.
Connecter app
There’s quite a few plugins for 3ds max out there that can help you organize your assets. The free Connecter app by CG Connected is by far my favorite and the only one I use now.
Take a look at some of their quick tutorials, it’s really simple and works like a charm. It even allows you to keep your messy file structure of your asset library, but you might as well start to organize them a bit better. Who knows if they stop the development of the app and it won’t work with a future version of max. If that happens, you’ll still know how to find your stuff and get it ready for a new asset manager app.
Use Network Paths
As I mentioned in Part II it is crucial that your assets links to a location your node will be able to read from. I highly recommend network paths.
The problem you are facing now is that all of your assets links to somewhere local on your workstation or an external hard drive – same thing, the render node won’t be able to read them.
Since I haven’t found a way to batch relink all of my assets, I do it as I need them -please write me if you know about one and I’ll update this guide asap.
The Connecter app makes this really quick and easy to do. It allows you to drag ‘n drop your models from the app directly in to the 3ds max viewport. After merging the model into the scene, the app will prompt you to relocate the texture paths if they aren’t matching. If you are dragging in old models you have already mapped textures to locally, the app won’t prompt you. In this case you can just use the Relink Bitmaps plugin to remap the links through a network path (as explained in Part II).

To apply network paths to your new models, you need to browse for the location fairly close to the asset you are using.
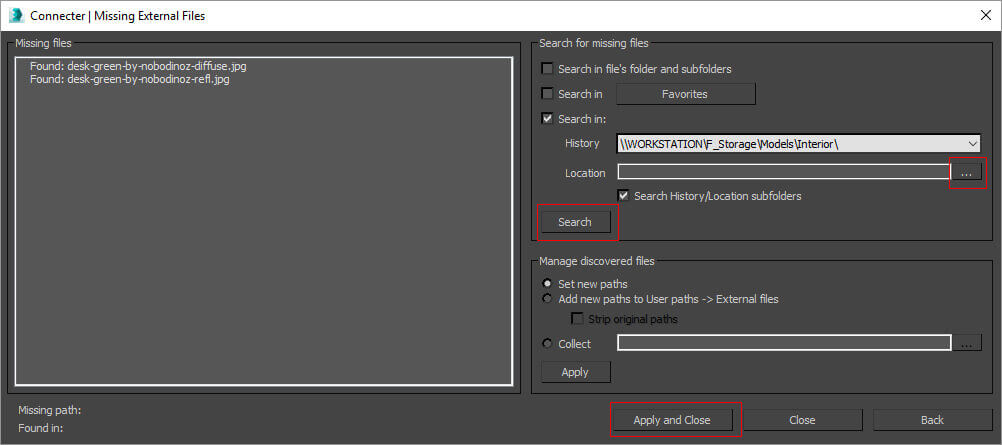
Here I’ve browsed to my “…/models/interior” folder and the app managed to find the missing assets in a subfolder. Next time you drag in a model, you can simply click the history tab and then click “search”. I’ve tried to add the same path to the “Favorites” button, but for some reason this doesn’t seem to work. The app is still in the beta stage, so things might change.
The app does some work behind the scene and relinks the model you dragged in with it’s new paths. So the next time you drag that model in, the paths are remembered and will work with the render node. Pretty nice right?
Rendering your first job on the node
In case you missed it in the guide from Autodesk on how to use backburner, it’s crucial that you remember to specify where the render node should save the rendered image. If you forget this, the image is lost and you have to render again. So make this the first step when you set up the render job:
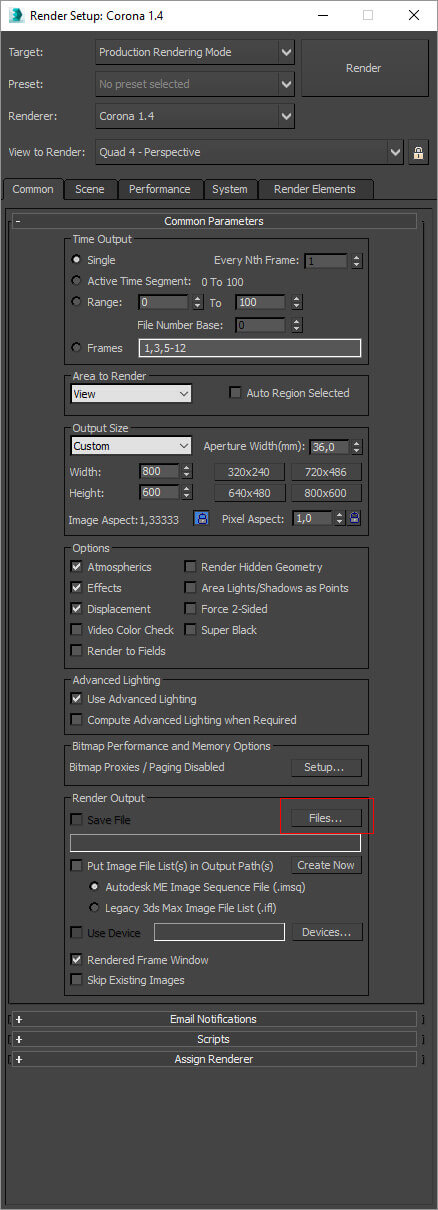
Remember to browse to the save location through the “Network” group and not “This PC” so you’ll get a network path – yeah I’m really trying to make you remember that you are now working via network.
Render passes and file formats
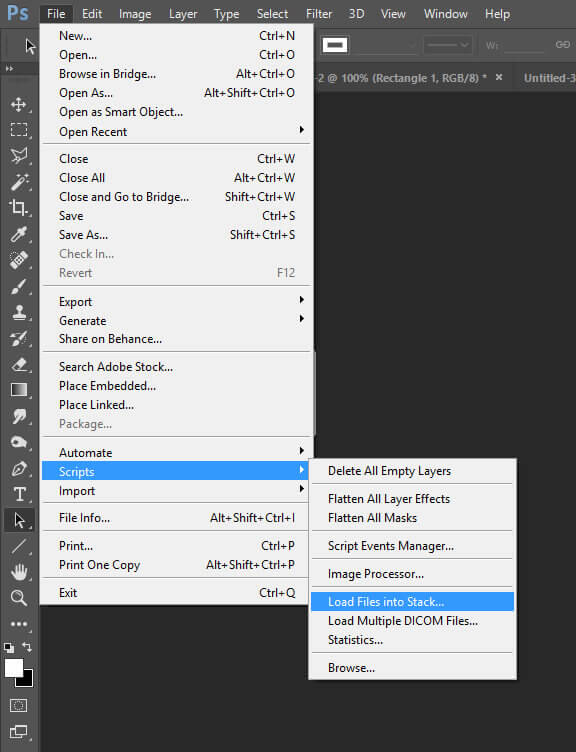
The same thing goes for your render passes. Save them to a network location (preferably the same as your normal image output. If you’re not feeling too fancy, I recommend 16- or 32bit tiffs as you get more image information (texture details and lighting) to play with later in Photoshop.
In Photoshop you can load them all at once by using the “Load Files into Stack” option. Like this:
I hate all these separate render passes lying around in folders, it’s a mess. So what I find really great is to save my render output in the .exr format. This will result in just a single .exr file that includes everything (the main image and all your render passes).
The only downside is that Photoshop can’t separate all those passes into layers unless you get the 50$ (It’s now free!) ProEXR plugin from fnord. Update: There’s also a free plugin called Exr-IO this one seems a bit more user friendly, so I’ll personally try it out soon.
Distributed rendering
While it’s great to be able to send render jobs to the node and continue work on your workstation, there will be times where you’ll only have one big image to do or maybe an animation. This is where distributed rendering (DR) comes in handy.
Basically, the DR option of your render engine will use both/all your available machines to work on just one single image.
Speed up the start up
If you want to save a little money on your electrical bill, turn off the render node when you know you won’t be needing it for a period of time. Mine doesn’t run during the night unless it’s actually working on an image. That meant that every time I would turn it on, I had to log on through TeamViewer to launch the Backburner Server, Corona DR server etc.
You can make windows do that for you when the node starts up – also remove any password/login stuff on the node so you don’t have to type that in.
Its really simple to do: How to make a program run at startup on any computer – quick and easy guide from howtogeek.com
Now you can just power on the node, wait for it’s name to pop up in a TeamViewer notification or see it in the Backburner Manager on your workstation. You are now ready to start sending render jobs to it.
Keep an eye on the CPU temperature
During the many hours of work your node will heat up. The Xeons are build to operate well without damage at fairly high temperatures. Even though they are able to do this, I found it assuring to know that things weren’t overheating.
On the node you can install a very simpel program called HWMonitor. Launch this when you are rendering your first render job and make sure the temperatures doesn’t go above 85 degrees celsius (185F). If they do, there’s something wrong with your CPU cooler or airflow through the case. If they don’t, be happy and check them again when summer time arrives.
Happy rendering!